The Toolbox: Clone Tool
The Toolbox is going to be a series of articles in which we discuss the tools available in iPiccy Photo Editor. We’ll talk about the strengths, weaknesses, and appropriate times to use these tools. Last time we talked about the Dodge/Burn Tool, but today we’re talking about the Clone Tool.
How To Clone Tool
The Clone tool has a bunch of different uses and purposes. The most simple answer is cloning to simply add more of that particular object to your image. However, the clone tool can do things like help remove pesky double chins. It can also help you do retouches on your personal images in general. You can watch this video to learn that (the audio has static, but the information is useful):
NOTE: THIS VIDEO IS FROM AN OLD DESIGN OF IPICCY BUT THE PRINCIPLES ARE STILL THE SAME. THE CLONE TOOL IS IN THE SAME LOCATION.
Otherwise, using the clone tool is fairly straightforward. You click on the Clone Tool under the advanced section of the Basic Editor Tab, and select the brush size. Brush size is very important as it shows you how much of the object you’ll be cloning. Keep in mind it clones in the same path that you move as you’re printing the newly cloned subject.
Examples of the Clone Tool
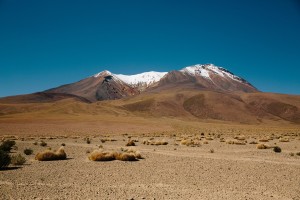
An easy example is wanting to add something more to the picture in the foreground or anywhere else. This landscape for example is a fine picture. However, I think could use another something in the foreground of the photo.
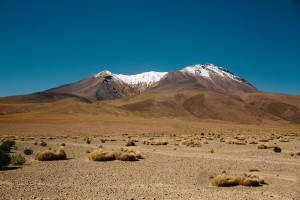
So you pick something from the current photo and select the clone tool. Make the brush just big enough to encompass the item you want to clone. If you’re getting some excess from the background that’s fine. However, it is very important that you use the eraser to clean up that excess, because if not it will become permanently a part of your image.
This, for example is a poor cloning job. As the shrub itself may look okay, but the sand around it is clearly discolored and doesn’t match. This is easily fixable as after you’ve finished cloning your desired object, you should click on the eraser that is in the clone tool menu, and erase the excess cloning.
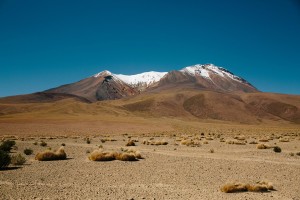
This is a very basic representation of what the cloning tool is capable of, but if you’ve noticed I cleaned up the excess background that was cloned and it looks a little less cluttered and the sand matches better.
While I scratched the very minimal surface of the tool, you now know the basics of it, so start honing your cloning skills and make some great edits!


